>

Tuesday, December 31, 2013

2013 hits and misses


Wow, 2013 went by so quickly!

It's certainly been an interesting year, my 6 weeks in New York (which I loved!), my first long term-full time vet job and most relevant to this all.. I started my blog! I had been thinking about it for a while, but after meeting all the wonderful seamstresses at Lladybirds meet-up I knew I had to start blogging too! 

Some of my favorite posts to read are the Top 5 posts, so I'm going to join Gillian and post my Top 5 lists before this year is over.. I've been sick for the last 4 days (really nasty flu bug, thanks dad!) and I've been making lists in my head of hits and misses.. I've already noticed that the lists seem to change from day to day depending on my mood.. Hmm.. Fickle me..

Let's start with the misses.. Or actually they are the lesser-worn-items. (pfeeww that sounds much better!) I only have three of those from this year, which I think is quite a good achievement! 

(oh and one coat that never got finished, because at first it was just looking to goth instead of chic and then I chopped of the bottom part and then it became way too short. Now that I remember, I already made the most gorgeous silk lining for it, maybe I should dig it up and see if I can save it somehow, to be continued!)


 I think my face says it all.. When I look at the pictures I feel a slight pang of disappointment because I really like the fabrics together. I've only worn it once however, apart from taking the pictures. I think it's  two things adding up, one was the fact that I had so many issues while making this top. Which resulted in using my seam ripper a crazy amount of times for one simple top. The second is my interfacing/fabric weight choices. It just doesn't work. Shame..


This is the dress I made for the Sew Bossy challenge. And I actually love the dress and the fabric, but it is just too tight across my bust and arms :( For the pictures I tried to choose the ones that don't really show the gaping, but trust me, it's there. I'm really sad that this didn't work out the way I planned, but I'm hoping to make a slightly bigger version next summer!


3. Drape Drape dress

Argh I hate that this dress didn't work out. It was a lot of work to get all the pleats right etc, but it is just way to big :(
 I wore this to a wedding recently and at first I thought I was very smart and that this dress could be saved with some boob-sticking-tape. Just like you think they do in Hollywood. Well.. Let me tell you, that does NOT work. When we arrived at the wedding I looked down and noticed that the tape had come loose from the dress and was just sticking to my chest out in the open. Looking really weird and wrinkly.. After a quick trip to the bathroom to remove the tape I ended up with red stripes on my chest and had to be super careful the rest of the evening to avoid any nipple-gate scenes.. 

Allright! Now the fun stuff, the hits!


I practically live in this coat. I even took it with me to Italy, despite the fact that isn't really warm enough for snowy weather. Can't wait for my next woolen-spring-Minoru!

2. Deer and Doe Belladone
This dress is the perfect combination of cute fabric and an awesome pattern! It fits like a glove (due to the slight stretch of the fabric, that is missing in my bleuet dress) and it even has pockets! Yay!

3. Sewaholic's silk Saltspring maxi
Made out of my favourite type of silk (crepe) and in a solid colour, this is one of my favorite makes so far! Can't wait to make more versions this summer (and then I will eliminate the back zipper opening :))

4. My second wiggle dress
The two things that make me really look forward to winter are: 
1. being able to wear my Watson jacket
2. wearing my wool wiggle dress again :)

5. Victory Patterns Roxanne
I love this fabric so much! I still wear this top a lot during winter, but now under my favourite oversized wool sweater :) 

Well, that was hard! Choosing just 5 favorites, but I guess thats what makes it an awesome sewing year :) 
I've got three other projects which I really really like, so I'm going to post them too, hah!

The portside travel set
These bags are just awesome! They've been to Singapore, Indonesia, Germany and Italy so far and every time I pack them I've been really happy. Even if I pack my duffel for an overnight shift at the clinic, I'm just happy :) 

Ohhh Lulu bikini

I made my own bikini! And it stays on even while diving, enough said I think :)

The knitted Pterodactylus
This little dinosaur is the reason I picked up my knitting needles again. I had been making scarves before this, but nothing with increases/decreases etc. Now I've almost finished my 3rd sweater (but the first one with shaping etc) and knitting is quickly becoming my second favorite hobby! Sometimes to the dislike of my bf, who jokingly pulled at one of my needles recently, only to discover that he made me drop 8 stitches on my first cabling project, which made me feel really nauseous! Luckily I was able to recover the stitches and my bf was really perplexed about it, he promised not to joke like that anymore :)

I also took an Itajime class while I was in New York this year and that was also one of my creative highlights of this year, can't wait to dye more silk this year!
I absolutely love this shirt.. 
Well, all in all it's been an amazing year and I can't wait to see what 2014 will bring! Hope all of you guys have a great new years eve and a very happy new year!

Thursday, December 19, 2013

Hot Cocoa sweater, a free pattern from Dixie DIY!

This is my first Hot Cocoa sweater and I'm in love! I've already made 2 more and I'm wearing them all the time.. 

The Hot Cocoa sweater is a free pattern designed by Dixie from Dixie DIY. It only has 4 pattern pieces (without the cufs and neckband) so it's a super quick make! From start to finish it only took me about 1.5 hours! 

I found this fabric at The Stoffenspektakel and it was a pre cut piece of 2 meters for 5 euro's, so good deal! I think it is polyester, because it's quite hot and non breathing, but I still like it.

The only thing I changed on my next versions was to lengthen the sleeves about 5cm. I used my double needle to topstitch the neckline. I really live the look of the neckline, there's even some accidental pattern matching! 

And now for the fabrics I treated myself to while in Indonesia.. The first one is an ikat fabric, it's quite stiff and scratchy feeling, but I really loved the colour and print. I'm planning to use it for a bag, maybe another Portside duffel? 

The ants were a bit upset with my fabric blocking their path!


I got this scarf at Threads of Life, it is a handpainted cotton and is really soft! It's a bit see through and originally I wanted to make a flowy summer shirt with it, but maybe I'll just use it as a scarf first!

And now my favourite... This was the only fabric I found which was sold by the meter. It's a thick cotton, hand dyed and stamped. The pattern still feels a bit waxy, so I'm wondering what a carefull hand wash will do to it. 

I'd love to make some pillows or a bag out of it. Maybe if it softens up enough I can make a jacket out of it? My first christmas present I already got from my sis is the Rigel Bomber from Papercut Patterns, so who knows... 

Any last minute crafting or finishing gifts for you? I've finished the geometric sweater for my sis in time and she was over the moon with it :) Now we're on our way to Italy for some snowboarding.. 

Have a super good christmas everyone and good luck with last minute crafting/finishing! 


Tuesday, December 17, 2013

Wool and the Gang: my Stripy Coco Mariniere sweater

Hi guys!
Thanks for all the super sweet comments on my bikini post, it felt really strange putting photo's of me in my bikini up on the internet, but I'm happy I did it. 
I've still got enough pics that I made my bf take while we were in Bali for two more posts.. Let's pretend it isn't freezing here in The Netherlands right now.. 

 I finished my second knitted sweater! The pattern is from Wool and the Gang and it's the Stripy Coco Mariniere top. When I fist spotted it on their website they also had a picture with sleeves. So I really wanted to make it. After buying the pattern, there were no sleeves included! So I emailed them and got a super quick reply with a sleeve pattern.. The only thing they didn't include were the stripes, so I had to do some math before I could begin..

It is knit in cotton, so that's why I don't look like I'm about to melt in these pictures.. Since I already had the feeling that it might turn out too big, I reduced the number of stitches. It's still pretty big/wide, but nothing too bad. The only part I don't really like is the sleeves, which are too long.. Even for me with my long arms, I get a whole bunch of bunching up around my hands..


When I did all the sleeve math I tried to calculate it so that the stripes would line up nicely with the bodice, only I forgot that the sleeve also had to be attached to the body.. Smart me. Rather then taking the whole sleeve apart I figured I should learn to live with it.. Overall the stripes line up quite well, so I'm still kinda happy.
 When we were in Ubud we visited Threads of Life, a fairtrade business which works with people in rural Indonesia to make textiles and baskets using local materials, local techniques and natural dyes. I really loved seeing all these gorgeous textiles and in my next post I'll show you what I bought. I couldn't afford the gorgeous ikat sarongs, but I can always look at the pictures again..
I love the bottom one.. 

Beautiful indigo table cloth 
This fabric was absolutely gorgeous! It was quite heavy and woven in this amazing pattern, I believe it was about 300 dollars, which is out of my price range, but look how beautiful it is!

Have you been knitting recently? And what do you prefer, wool or cotton? I think I prefer wool, but for summer I've already got yarn for two more cotton sweaters..

Next up will be another sewing project, I promise! And more fabric pics :)

Saturday, December 14, 2013

My Ohhh Lulu Bali Bikini

For my trip to Bali I needed a new bikini, after some searching I found the gorgeous bikini that Sarah from Ohhh Lulu made using her patterns. The top is made using the Jasmine Bra pattern and the panties are made with the Grace Panties pattern.
 Since I'd never used an Ohhh Lulu pattern before I wanted to make a wearable muslin first, to get an idea about the construction and sizing, I used some underwear elastic and knit fabric from my stash and some of Mood's plaid flannel (I still want to make pyjama's from this fabric!).

 The fit was really good, so on I went with my bikini plans. I still had some blue swimwear lycra in my stash. I ordered swimwear lining, boning and elastic from Lingeriestoffen.nl.
I followed Sarah's instructions and made the same changes as she did. One of them is to make the back band narrower, so it fits the bikini closure.


I also sewed boning onto the front and side seams, which make it nice and sturdy, it even stays up without needing the straps!

 Not that you need a sturdy bikini for sunbathing..
 For diving however.. It is very useful!

 I'm super happy with my new bikini, and it wasn't a lot of work either! I'd definitely recommend this for anyone who wants to make a bikini..

I was hoping that I could also make a black Bombshell swimsuit before my trip, but unfortunately the black swimsuit lining wasn't available in time. I've now got it safely stashed away for springtime however!

Tuesday, December 3, 2013

Another love story, my first Archer..

Wow, I feel like I've been living under a rock, for not making an Archer sooner.. After seeing all the super cool Archers that you've all made I finally joined you and made one myself! Perfect timing as well, as december is Archer appreciation month!

Usually I don't really like button up shirts, but since I finished my Archer this sunday I've already worn it twice.. And I really like the style and fit. This is supposed to be a wearable muslin, and it is super wearable indeed, but I did make some small mistakes which I will show you later.
I really like the view from the back
I cut a size 4 (or 2? can't remember right now and I'm at work.. sorry!) and added 1 inch of length to the pattern pieces. Since I've come to realise that I have a longer upper body then most patterns are designed for. I followed Jen's tutorial which made it super easy. I really like the length now. For all the other assembly steps I also followed the Archer Sew Along, because I find that seeing the photo's really make the construction process much easier for me.

Since this was intended as a muslin version I used a not-too-expensive cotton, which I still really like. It has small red/purple blocks on it, which have a darker spot in the middle. My next version will be a flannel (which I ordered from Mood) version, kinda (or really) similar to Lauren's super cool one. And for summer I can't wait to make a black silk one with some coloured details..


So now for my screw ups.. I cut the pockets slightly off grain, which doesn't really show, but I still need to keep this in mind when I make my plaid version.. I also folded and sewed the pleats wrong at first, but luckily I found out before I attached the yoke.
The bigger screw up however are my cuffs.. I folded one of the sleeve plackets to the wrong side, so that resulted in me also sewing on the cuffs slightly wrong, so now my two cuffs face the same side.. Ahh well, leason learned!
Look at my cuffs, all coordinated..
I also have some other finished objects and some fabric shopping photo's from Singapore and Bali, which I will share with you soon, I promise!


Wednesday, November 6, 2013

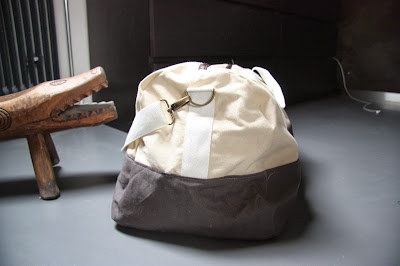
Three more bags, the Portside travel set!

Whoohoo, it's almost time for another trip! Tonight I'm flying to Bali, with a stopover of two nights in Singapore :) I had already seen a sneak peak of the new Portside travel set from Grainline Studio, so when it was released last week I knew I had to try and make them before I went away! I think my Weekender bag is perfect for roadtrips, but I didn't really want to bring it with me to Bali, just in case it ripped or something.. 
Super happy! As is my crocodile, which I got last time in Bali
This was the first time I went to the copyshop to get my pattern printed. And I was super happy with the result! No more wonky cutting/pasting lines and all the pieces are nice and firm. It cost me 3.90 euro and I think it is money well spend.
Look at how great this is!
 I had this canvas fabric in my stash, they're leftovers from other projects. The white/beige was just enough for the contrast fabric, lucky me! And I had enough fabric left over from my Minoru lining for this lining.

At first I wanted to use silver hardware, but the D-rings they had at the market were way too big. After looking at it again, I decided that bronze coloured hardware looked way better, so I changed it. That meant removing the straps for the second time, because the first time I'd sewn them on completely wonky. One tip: measure everything! I didn't at first and it doesn't look good when the straps are leaning towards the left..
Silver and bronze, I prefer the bronze!
Nice and straight
 I also added an interior pocket, because it makes finding small/important things in my bag so much easier.
Interior pocket
 One thing that I was super happy to be able to do differently then the pattern instructions say is the lining.. The instructions suggest handstitching the lining in to the zipper, but I did this with my Weekender bag and wasn't super happy with it. I just don't like handstitching things to zippers I guess. But with my duffel, I was able to use my machine! YAY! I used the cream coloured thread on top, black thread on the bobbin and all worked out perfectly :)

 I did break two needles in the process, but that is completely my own fault, for not paying attention where the zipper ends.

 The pattern also includes two smaller bags, the dopp kit and a smaller travel pouch. Which are both super cute! The travel pouch comes together really quickly and is super versatile and its size is perfect!

The dopp kit is also super useful, as I could squeeze in all my toiletries. Which means a lot, cause I always bring a lot of stuff with me. The only mistake I made is that I didn't add the contrasting piece on the backside, instead I just cut it out of one piece. I didn't do this on purpose, but I don't really mind now. The only thing is that I didn't interface this piece, so it's a little bit softer than it's supposed to be.
Ooops..
Jenn also added a small zipper pull which you can make out of leather, super cute!

Overall I'm super happy with this pattern and my new bags! I've packed everything and am ready to go travelling tonight! I also packed some new and unblogged makes (one of them is a bikini!), which I will photograph in Bali, so that will come soon :)